- The Diamond Pattern is a rare but powerful chart formation that signals a potential trend reversal in crypto markets.
- Traders should always wait for a confirmed breakout and combine it with volume, support/resistance, and disciplined risk management to improve success rates.
- While the Diamond Pattern provides valuable insights, its reliability depends on broader factors such as technical indicators, overall market conditions, and external news events.
In crypto trading, the diamond pattern stands out as a rare but highly effective trend reversal signal. The Diamond Pattern, while not as widely discussed as triangles or head-and-shoulders setups, deserves a place in every crypto trader’s toolkit due to its ability to mark significant turning points.
This guide takes a professional and systematic approach to the Diamond Pattern for crypto traders. After reading this article, you will be able to trade this pattern with confidence. Let’s dive in:
What is the Diamond Pattern?
The Diamond Pattern is a technical analysis formation that signals a possible trend reversal. It gets its name from its unique shape, where price action first widens out (like a broadening formation) and then contracts again, forming a diamond-like structure on the chart.
This pattern typically emerges after a strong bullish or bearish trend and often signals the end of that trend. In other words, when a diamond forms, the market indicates that momentum is fading and a new direction may soon emerge.
While the Diamond Pattern is not as common as triangles or wedges, it is considered powerful because it reflects a clear shift in market psychology. The buyers and sellers are battling for control, followed by a decisive breakout.
In crypto trading, the Diamond Pattern can be spotted on multiple timeframes, but it tends to be more reliable on higher ones (such as 4-hour, daily, or weekly charts). Crypto traders who recognize it early can prepare for large swings that often follow the breakout.
Formation of a Diamond Pattern
To trade the Diamond Pattern well, you need to understand how it forms, why it forms, and what signals to watch for. Let’s break it down into parts you can clearly recognize in your charts.
Existing Trend
Before the diamond appears, there’s usually a strong trend, up or down. That trend is what gets “tested.” If you see price advancing steadily, or dropping sharply, keep an eye out for signs of exhaustion.
Broadening Phase (Expansion)
After the trend, the price starts to swing more wildly by creating higher highs but also much lower lows. Volatility generally increases. This is the “left side” of the diamond. It’s market participants pushing and pulling. Buyers and sellers are still pushing in their direction without either side fully dominating.
Contracting Phase (Compression)
After expansion, the price swings begin to narrow. Highs don’t get much higher, and lows don’t get much lower. The range shrinks. This is the “right side” of the diamond. It shows indecision: neither buyers nor sellers are strong enough to expand the range further.
Breakout / Breakdown
The pattern ends when the price breaks out of this narrowing range. The direction matters:
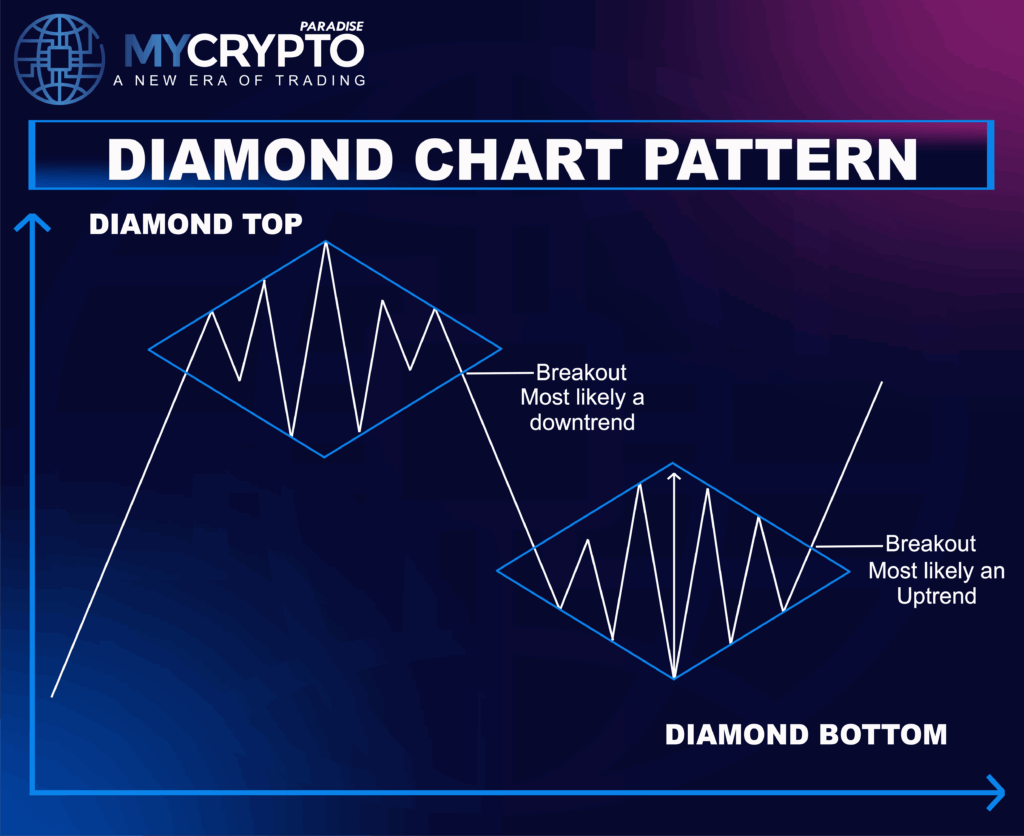
- If the prior trend was up, the breakout often means a downward Diamond Top (bearish reversal).
- If the prior trend was down, a breakout often flips upward Diamond Bottom (bullish reversal).
The strength of this breakout (how far the price moves, how fast, how much volume behind it) is what gives the signal real weight.
Is the Diamond Pattern Bullish or Bearish?
The Diamond Pattern itself is neutral while it is forming. Its direction, bullish or bearish, depends entirely on the preceding trend and the direction of the breakout. Waiting for that confirmation is what separates a professional trade from a false signal.
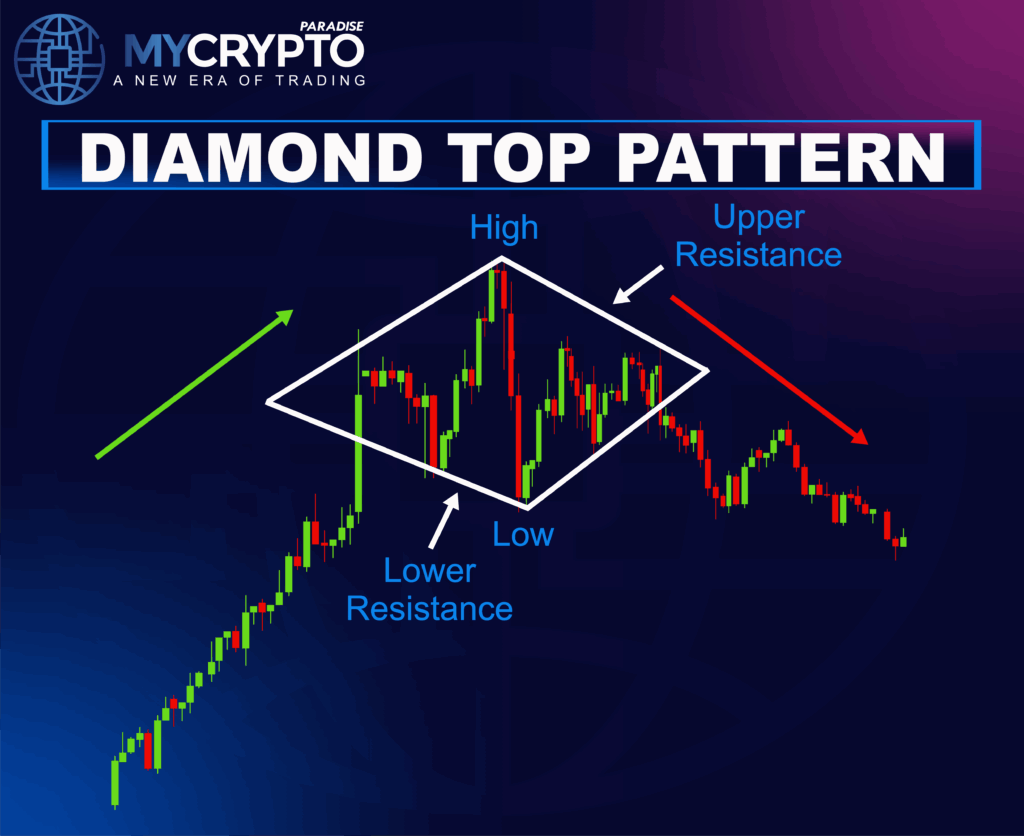
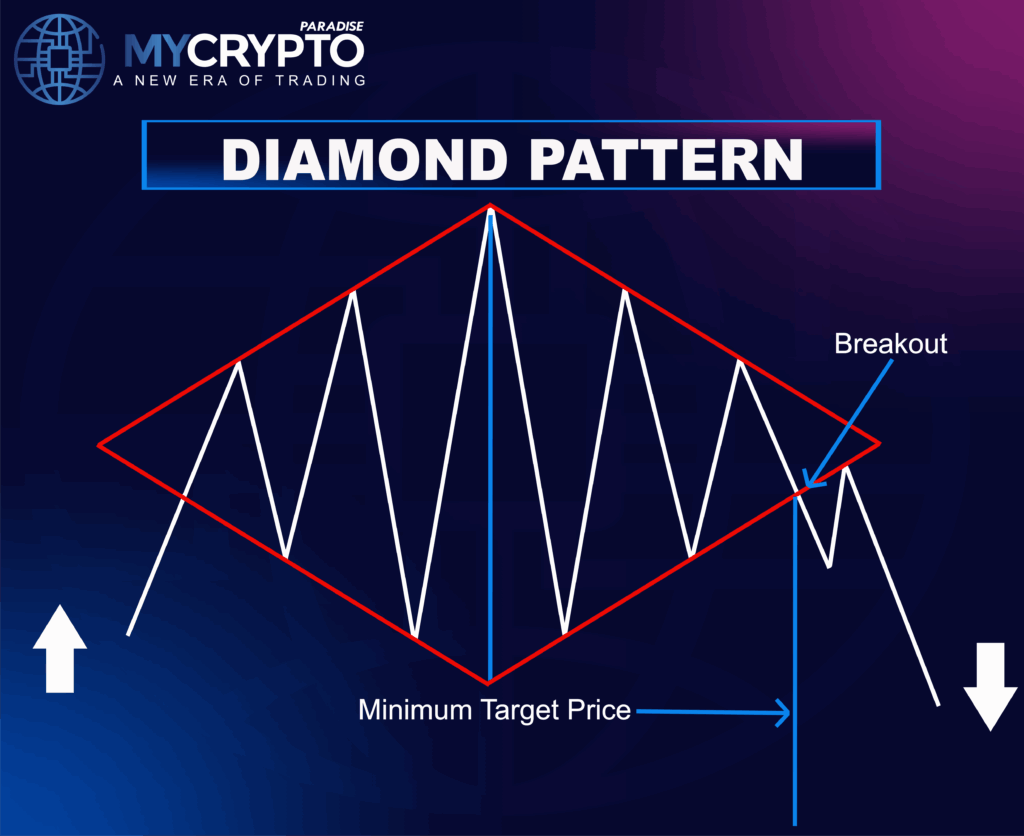
Diamond Top
When the Diamond Pattern forms after a strong uptrend, it is known as a Diamond Top. In this case, the expanding and then contracting price swings represent a shift in control, from eager buyers to sellers stepping in with stronger momentum.
Once the price breaks down from the pattern, it confirms a bearish reversal. For traders, the Diamond Top serves as an early warning that the uptrend is losing steam and that a new bearish phase may be underway. This is often the point where professional traders look to secure profits or prepare for short opportunities.
Diamond Bottom
When the same structure develops after a prolonged downtrend, it is called a Diamond Bottom. Here, the pattern signals exhaustion among sellers and growing strength from buyers. The broadening swings followed by tightening consolidation show indecision, but once the breakout happens to the upside, it confirms a bullish reversal.
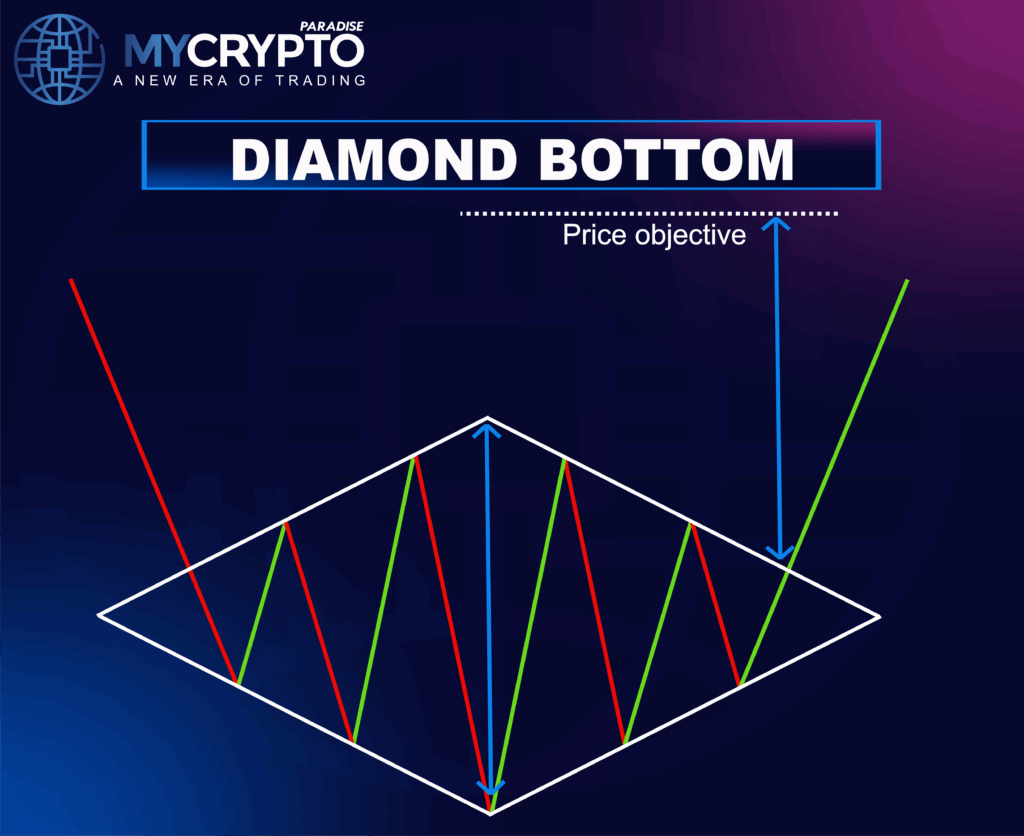
For crypto traders, a Diamond Bottom can mark the beginning of a recovery and present an opportunity to enter long positions early in the trend.
How to Confirm If the Diamond Pattern is Reliable?
Not every diamond-shaped formation on the chart should be trusted. False patterns appear all the time, so entering too early can lead to losses. That’s why professional traders look for certain conditions that make the Diamond Pattern more reliable:
Timeframe Matters
The Diamond Pattern is far more reliable on higher timeframes such as the 4-hour, daily, or weekly charts. On smaller timeframes, crypto’s natural volatility can create diamond-like shapes that are nothing more than noise.
Volume Confirmation
A strong Diamond Pattern usually follows a volume pattern: increasing volume during the expansion phase, declining volume during the contraction, and a sharp spike on the breakout. Without this confirmation, the breakout is less trustworthy.
Clear and Symmetrical Shape
The best patterns have a clean structure where the expansion and contraction phases are easy to identify. A messy or uneven formation often leads to false signals and failed trades.
Context of the Trend
Reliability improves when the Diamond Pattern forms after a well-defined trend. A Diamond Top after a strong uptrend or a Diamond Bottom after a clear downtrend carries much more weight than one forming in sideways conditions.
Support From Other Tools
Professional traders rarely act on a Diamond Pattern alone. When it aligns with support and resistance zones, moving averages, or momentum indicators like RSI and MACD, the chances of a successful trade increase significantly.
How to Trade the Diamond Pattern in Crypto?
Trading a Diamond Pattern isn’t about guesses because it’s about waiting for confirmation while managing risk. Below is how experienced crypto traders approach entries, targets, and stops when this pattern forms.
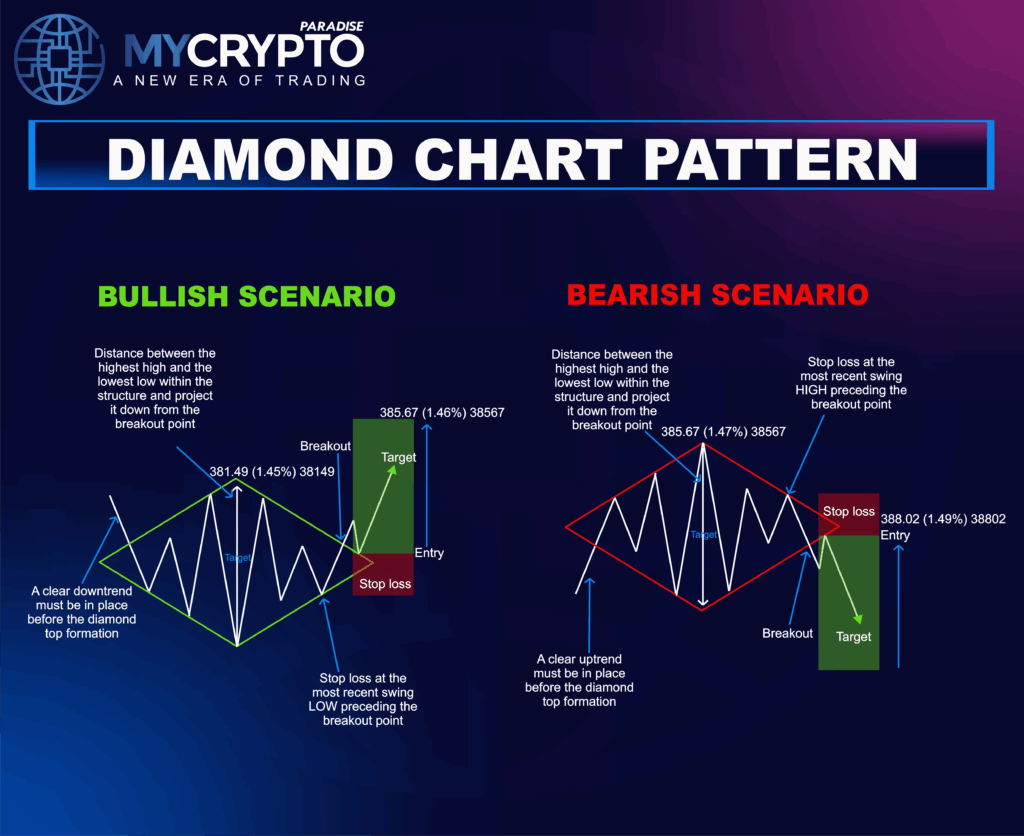
Entry Point
You don’t enter while the diamond is still forming. A proper entry comes after the price breaks out of the pattern’s boundaries. In a Diamond Top, you look for a break below the lower trendline; in a Diamond Bottom, a break above the upper trendline.
Many traders wait for a full candle close beyond the line to avoid false breakouts. Some prefer to wait for a slight retest of the breakout line before entering because this can give you a better risk/reward ratio and confirm the breakout is holding.
Take Profit
Once you’re in, your take profit level is often calculated using the “height” of the diamond, measured from the highest point to the lowest point. Then project that distance from the breakout point in the direction of the move.
Another method is to watch for nearby support or resistance zones and allow price action to guide you. As the trade evolves, you may scale out or adjust targets if momentum is strong.
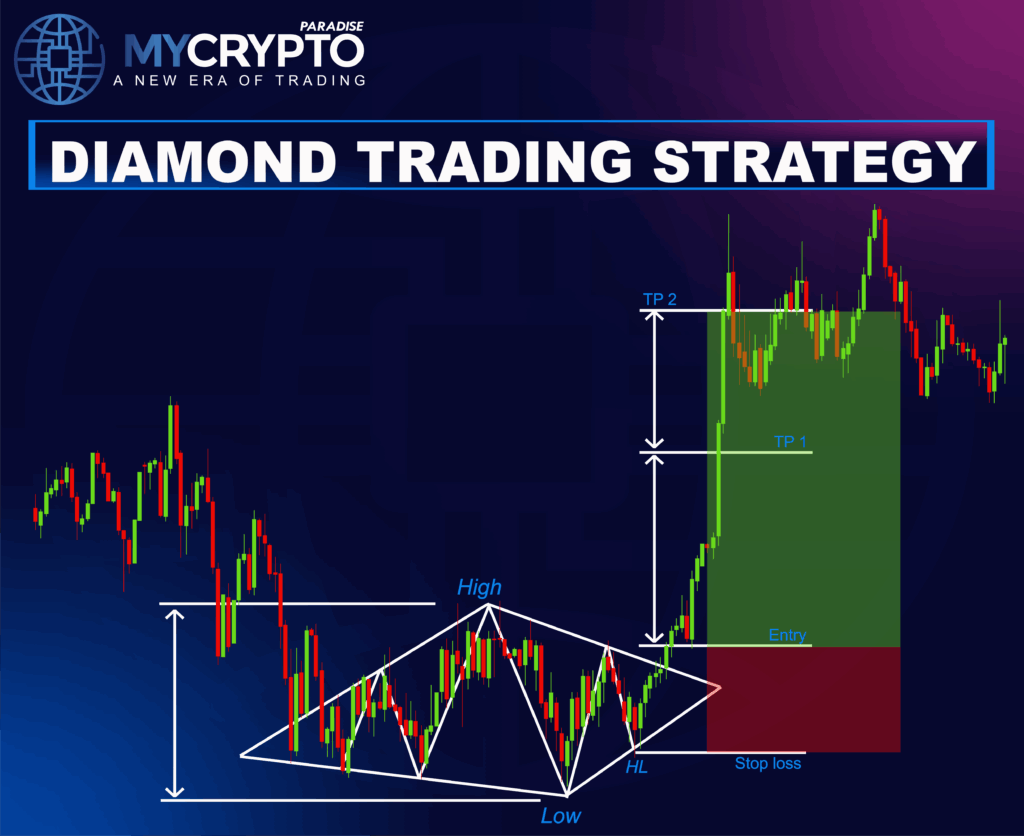
Stop Loss
Your stop loss should protect you from being shaken out by noise, but also preserve capital. For longs (Diamond Bottom), place the stop just below the lower boundary of the diamond; for shorts (Diamond Top), just above the upper boundary.
Some traders give room for volatility and place it slightly farther, especially in crypto, where swings can be wild. The key is not to set it so wide that you take larger losses than you’re comfortable with.
Diamond Pattern vs Similar Patterns
At first glance, the Diamond Pattern can look similar to other well-known formations, which often leads to confusion for traders. Knowing the differences is important to avoid misidentifying the setup and entering trades too early.
Diamond Pattern vs Head and Shoulders
The Head and Shoulders pattern is one of the most popular reversal formations and can sometimes resemble a Diamond Top. The key difference is structure: Head and Shoulders has three clear peaks with a higher middle peak (the head) between two lower ones (the shoulders).
The Diamond Pattern, on the other hand, has a broader expansion phase followed by contraction, creating a diamond shape rather than three distinct peaks.
Diamond Pattern vs Symmetrical Triangle
A Symmetrical Triangle also forms through contracting highs and lows, which can look similar to the second half of a Diamond Pattern. The difference is that a triangle does not begin with an expansion phase, as it simply contracts from the start. A true Diamond Pattern shows both expansion first and then contraction, making it more complex and less common.
Diamond Pattern vs Broadening Formation
A Broadening Formation shares similarities with the first half of the Diamond Pattern, where price swings become wider with higher highs and lower lows.
However, in a pure broadening setup, the price doesn’t later compress to form a diamond shape. The Diamond Pattern is unique because it combines both broadening and narrowing phases before the breakout.
Probability of Profit Using the Diamond Pattern
When it comes to trading reliability, the Diamond Pattern sits in the middle ground. It’s not as frequent as Head and Shoulders or Double Tops/Bottoms, but when it does appear, it can deliver strong reversal signals.
Historical performance shows that Diamond Tops have a higher probability of playing out correctly compared to Diamond Bottoms. This is mainly because markets tend to fall faster than they rise, making bearish breakouts more decisive. In crypto, however, both sides of the pattern can be profitable if traded with patience and proper confirmation.
Still, traders should remember that no pattern works 100% of the time. The Diamond Pattern’s reliability improves when combined with other tools like volume confirmation, support and resistance zones, and momentum indicators. Without these filters, false breakouts are more common, especially in highly volatile altcoins.
In short, the Diamond Pattern is a valuable tool in your strategy, but it becomes truly reliable only when used systematically and with disciplined risk management. If you’re new to all this, you can reach out to our Professional Traders at ParadiseFamilyVIP🎖️ for consultation.
Common Mistakes to Avoid
Even though the Diamond Pattern can be a powerful reversal signal, many traders misuse it. Avoiding the following mistakes will keep you from turning a strong setup into a costly error.
Entering Too Early
One of the biggest mistakes is jumping in before the breakout is confirmed. The Diamond Pattern often looks complete before it truly is, and entering early exposes you to false signals. Always wait for a clear breakout and candle close beyond the boundary.
Ignoring Volume
Volume plays a critical role in validating this pattern. A breakout without volume support is more likely to fail. Traders who ignore volume confirmation often find themselves stuck in choppy, directionless price action.
Forgetting Market Context
The Diamond Pattern is more reliable when aligned with the broader trend and market conditions. Using it in isolation, without considering support/resistance or overall sentiment, reduces its effectiveness.
Poor Risk Management
Placing stops too tight or too wide can both ruin the trade. In crypto’s volatile environment, setting a stop loss at logical levels, just beyond the pattern’s boundaries, is essential. Risking too much on a single trade is another common mistake that undermines long-term consistency.
Conclusion
The Diamond Pattern is a rare but powerful reversal formation in crypto trading. By learning how to identify its structure, wait for breakouts, and confirm signals with tools like volume and support/resistance zones, traders can use it to spot major turning points in the market.
Still, no single pattern is a magic formula. Success requires discipline, protective risk management, and a strategy that blends technical setups with broader market analysis. At ParadiseFamilyVIP🎖️, we go beyond chart patterns, combining technical analysis, on-chain insights, sentiment tracking, and whale monitoring to deliver professional crypto signals and portfolio management designed for long-term success.
👉 Check membership availability for ParadiseFamilyVIP🎖️ (Click it)
If you’re serious about becoming a PRO trader, joining our inner circle is your next step. Seats are limited, so secure your spot or join the waiting list today.
FAQs
What is a Diamond Pattern in crypto trading?
A Diamond Pattern is a rare chart formation that signals a potential trend reversal. It forms when price first expands (wider highs and lows) and then contracts, creating a diamond-like shape. It can appear at both market tops (bearish) and bottoms (bullish).
Is the Diamond Pattern bullish or bearish?
It can be both. A Diamond Top is bearish and usually signals the end of an uptrend, while a Diamond Bottom is bullish and suggests the end of a downtrend. The breakout direction confirms which side is in play.
How reliable is the Diamond Pattern in crypto?
The Diamond Pattern is moderately reliable. Diamond Tops tend to perform better than Diamond Bottoms, but success depends on confirmation factors like breakout volume, trend context, and risk management.
How do you trade the Diamond Pattern effectively?
You trade it by waiting for a confirmed breakout. For Diamond Tops, look for a breakdown below support; for Diamond Bottoms, look for a breakout above resistance. Combine it with indicators (volume, RSI, MACD) and always use proper stop-loss levels.
What is the target price for a Diamond Pattern breakout?
The typical price target is measured by the height of the diamond (difference between the highest and lowest point) projected from the breakout point. Traders also consider nearby support and resistance zones when setting take-profit levels.
What mistakes should traders avoid with the Diamond Pattern?
Common mistakes include entering before the breakout is confirmed, ignoring volume, trading it in isolation without considering market context, and poor stop-loss placement. Patience and disciplined money management are crucial.